After building a standalone component in Part 5, I wanted to improve performance.
I've read many blogs about IScrollInfo, ItemsContainerGenerator, Generator, Selector and ItemsControl classes. I also digged into WPF source code through Reflector. But eventually I realized that this was all about 2D. And here, we are dealing with 3D. Therefore, we have to create our own solution...
To be continued... here.
Friday, October 24, 2008
Saturday, October 18, 2008
WPF Cover Flow Tutorial : Part 5
After Part 4, we will partly refactor the code to build a custom component.
We define a new assembly called FlowComponent where we will move most of the code. First, the c# code will be part of a new class called FlowControl. This class herits from UserControl :
This is the same in the xaml code : we migrate the Grid (its background) and the Viewport3D to our custom UserControl :
The Cover class is also moved to the FlowComponent assembly.
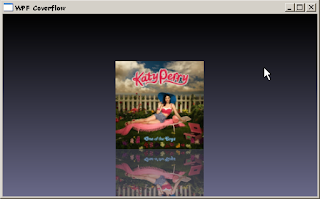
As we are creating a CoverFlow component, it is a good idea to deal with rectangle images. We update the Point3D coordinates with the ImageSource size. The ImageSource will be stored as a class attribute.
There is nothing much left in the TestWindow class. In the xaml code, after we've referenced our component assembly, we just use our FlowControl as main Content :
Continue with Part 6.
Edit 2014-02-23 : Code has moved to github.
We define a new assembly called FlowComponent where we will move most of the code. First, the c# code will be part of a new class called FlowControl. This class herits from UserControl :
using[...]The code from the TestWindow constructor is included in a new method called Load. It will build covers with the images from one directory. We also provide two new methods GoToNext and GoToPrevious to navigate between covers.
namespace Ded.Tutorial.Wpf.CoverFlow.Part5.FlowComponent
{
public partial class FlowControl : UserControl
{
#region Fields
private int index;
private readonly List<Cover> coverList = new List<Cover>();
#endregion
#region Private stuff
private void RotateCover(int pos)[...]
private void UpdateIndex(int newIndex)[...]
private void viewPort_MouseDown(object sender, MouseButtonEventArgs e)[...]
#endregion
public FlowControl()
{
InitializeComponent();
}
public void Load(string imagePath)
{
coverList.Clear();
var imageDir = new DirectoryInfo(imagePath);
int doneImages = 0;
foreach (FileInfo image in imageDir.GetFiles("*.jpg"))
{
var cover = new Cover(image.FullName, doneImages++);
coverList.Add(cover);
visualModel.Children.Add(cover);
}
}
public void GoToNext()
{
if (index < coverList.Count - 1)
UpdateIndex(index + 1);
}
public void GoToPrevious()
{
if (index > 0)
UpdateIndex(index - 1);
}
}
}
This is the same in the xaml code : we migrate the Grid (its background) and the Viewport3D to our custom UserControl :
<UserControl x:Class="Ded.Tutorial.Wpf.CoverFlow.Part5.FlowComponent.FlowControl"We can set the size we want. It will be overriden in the owner component. We set the ClipToBounds property to True to avoid covers from exceeding the bounds of our component.
xmlns="http://schemas.microsoft.com/winfx/2006/xaml/presentation"
xmlns:x="http://schemas.microsoft.com/winfx/2006/xaml"
Height="282" Width="490">
<Grid ClipToBounds="True">
<Grid.Background[...]>
<Viewport3D x:Name="viewPort" Grid.Column="0" Grid.Row="0" ClipToBounds="False" MouseDown="viewPort_MouseDown">
<Viewport3D.Camera[...]>
<Viewport3D.Children[...]>
</Viewport3D>
</Grid>
</UserControl>
The Cover class is also moved to the FlowComponent assembly.
As we are creating a CoverFlow component, it is a good idea to deal with rectangle images. We update the Point3D coordinates with the ImageSource size. The ImageSource will be stored as a class attribute.
private readonly ImageSource imageSource;With this new improvement, it is possible to use the component to browse photos :
private double RectangleDx()
{
if (imageSource.Width > imageSource.Height)
return 0;
else
return 1 - imageSource.Width / imageSource.Height;
}
private double RectangleDy()
{
if (imageSource.Width > imageSource.Height)
return 1 - imageSource.Height / imageSource.Width;
else
return 0;
}
private Geometry3D Tessellate()
{
double dx = RectangleDx();
double dy = RectangleDy();
var p0 = new Point3D(-1 + dx, -1 + dy, 0);
var p1 = new Point3D(1 - dx, -1 + dy, 0);
var p2 = new Point3D(1 - dx, 1 - dy, 0);
var p3 = new Point3D(-1 + dx, 1 - dy, 0);
...
}
private Geometry3D TessellateMirror()
{
double dx = RectangleDx();
double dy = RectangleDy();
var p0 = new Point3D(-1 + dx, -3 + 3 * dy, 0);
var p1 = new Point3D(1 - dx, -3 + 3 * dy, 0);
var p2 = new Point3D(1 - dx, -1 + dy, 0);
var p3 = new Point3D(-1 + dx, -1 + dy, 0);
...
}
public Cover(string imagePath, int pos)
{
...
imageSource = LoadImageSource(imagePath);
...
}

There is nothing much left in the TestWindow class. In the xaml code, after we've referenced our component assembly, we just use our FlowControl as main Content :
<Window x:Class="Ded.Tutorial.Wpf.CoverFlow.Part5.TestWindow"In the C# code, we just keep the Window_KeyDown method and the constructor :
xmlns="http://schemas.microsoft.com/winfx/2006/xaml/presentation"
xmlns:x="http://schemas.microsoft.com/winfx/2006/xaml"
Title="WPF Coverflow" Width="512" Height="320" KeyDown="Window_KeyDown"
xmlns:flow="clr-namespace:Ded.Tutorial.Wpf.CoverFlow.Part5.FlowComponent;assembly=Ded.Tutorial.Wpf.CoverFlow.Part5.FlowComponent">
<flow:FlowControl x:Name="flow" Margin="0"></flow:FlowControl>
</Window>
using System.Windows;That's it ! We've built a CoverFlow component reusable in other WPF applications. But this component needs improvements. We will add virtualization in the next part...
using System.Windows.Input;
namespace Ded.Tutorial.Wpf.CoverFlow.Part5
{
public partial class TestWindow : Window
{
#region Private stuff
private void Window_KeyDown(object sender, KeyEventArgs e)
{
switch (e.Key)
{
case Key.Right:
flow.GoToNext();
break;
case Key.Left:
flow.GoToPrevious();
break;
}
}
#endregion
public TestWindow()
{
InitializeComponent();
flow.Load(@"c:\_covers");
}
}
}
Continue with Part 6.
Edit 2014-02-23 : Code has moved to github.
Friday, October 17, 2008
WPF Cover Flow Tutorial : Part 4
We can improve the HCI from Part 3 with some mouse handling.
We add a MouseDown handler method to our Viewport3D :

Continue with Part 5.
Edit 2014-02-23 : Code has moved to github.
We add a MouseDown handler method to our Viewport3D :
private void OnViewportMouseDown(object sender, MouseButtonEventArgs e)This method uses the VisualTreeHelper to find which mesh was hitten by the mouse click. If there is a match, we update the index like we did before. Matches are found with this new Cover method :
{
var rayMeshResult = (RayMeshGeometry3DHitTestResult)VisualTreeHelper.HitTest(viewPort, e.GetPosition(viewPort));
if (rayMeshResult != null)
{
for (int i = 0; i < coverList.Count; i++)
{
if (coverList[i].Matches(rayMeshResult.MeshHit))
{
UpdateIndex(i);
break;
}
}
}
}
public bool Matches(MeshGeometry3D mesh)We also modify the TestWindow constructor to load all the pictures from a sample folder :
{
foreach (GeometryModel3D part in modelGroup.Children)
if (part.Geometry == mesh)
return true;
return false;
}
public TestWindow()Mouse click may increment or decrement the index by more than one cover. That's wy we need to fix the UpdateIndex method :
{
InitializeComponent();
var imageDir = new DirectoryInfo(@"c:\_covers");
int doneImages = 0;
foreach (FileInfo image in imageDir.GetFiles("*.jpg"))
{
var cover = new Cover(image.FullName, doneImages++);
coverList.Add(cover);
visualModel.Children.Add(cover);
}
}
private void UpdateIndex(int newIndex)It is now time to play with more covers. Let's try the current application with a sample folder containing 500+ covers. These covers are usually between 400x400 and 500x500 pixels. The next Process Explorer capture shows that the application needs a lot of cpu and memory resources :
{
if (index != newIndex)
{
int oldIndex = index;
index = newIndex;
if (index > oldIndex)
for (int i = oldIndex; i <= index; i++)
RotateCover(i);
else
for (int i = oldIndex; i >= index; i--)
RotateCover(i);
camera.Position = new Point3D(.2 * index, camera.Position.Y, camera.Position.Z);
}
}

- Loading all covers brings the cpu to 100%.
- Browing all covers with the Right key pressed also needs a lot of cpu. Moreover, this rises the cache size from 300 MB to more than 1 GB.
private ImageSource LoadImageSource(string imagePath)Thumbnails improve performance while browsing, but it is still slow at startup. We will try to improve this later.
{
var imageFile = new FileInfo(imagePath);
var thumbnailDir = new DirectoryInfo(Path.Combine(imageFile.Directory.FullName, "tn"));
if (!thumbnailDir.Exists)
thumbnailDir.Create();
var thumbnail = new FileInfo(Path.Combine(thumbnailDir.FullName, imageFile.Name));
if (!thumbnail.Exists)
{
Image source = Image.FromFile(imageFile.FullName);
int height = source.Height;
int width = source.Width;
int factor = (height - 1) / 250 + 1;
int smallHeight = height / factor;
int smallWidth = width / factor;
Image thumb = source.GetThumbnailImage(smallWidth, smallHeight, null, IntPtr.Zero);
thumb.Save(thumbnail.FullName);
}
return new BitmapImage(new Uri(thumbnail.FullName, UriKind.RelativeOrAbsolute));
}
Continue with Part 5.
Edit 2014-02-23 : Code has moved to github.
Thursday, October 16, 2008
WPF Cover Flow Tutorial : Part 3
In Part 2, we miss the animation part of the flow.
In the main TestWindow, we save all the covers in a List :
Edit 2014-02-23 : Code has moved to github.
In the main TestWindow, we save all the covers in a List :
private readonly List<Cover> coverList = new List<Cover>();We add an handler for the KeyDown event on the Window element. We will only deal with the Right and Left keys. Once one of these keys is pressed down, we animate the old current cover and the new one.
public TestWindow()
{
InitializeComponent();
var assembly = new FileInfo(Assembly.GetExecutingAssembly().Location);
var image = new FileInfo(Path.Combine(assembly.Directory.FullName, "Katy Perry.jpg"));
for (int i = 0; i < 10; i++)
{
var cover = new Cover(image.FullName, i);
coverList.Add(cover);
visualModel.Children.Add(cover);
}
}
private void RotateCover(int pos)Currently, we do not animate covers. We just move them from one place to another. In order to get a real animation, we have to deal with Animation objects. In this new version of the Animate method, we ask the engine to animate the covers. As we have saved the translation and rotation objects in two Cover attributes, we can directly update their parameters (angle and offsets).
{
coverList[pos].Animate(index);
}
private void UpdateIndex(int newIndex)
{
if (index != newIndex)
{
int oldIndex = index;
index = newIndex;
RotateCover(oldIndex);
RotateCover(index);
camera.Position = new Point3D(.2 * index, camera.Position.Y, camera.Position.Z);
}
}
private void Window_KeyDown(object sender, KeyEventArgs e)
{
int newIndex = index;
switch (e.Key)
{
case Key.Right:
if (newIndex < coverList.Count - 1)
newIndex++;
break;
case Key.Left:
if (newIndex > 0)
newIndex--;
break;
}
UpdateIndex(newIndex);
}
public void Animate(int index). Continue with Part 4.
{
TimeSpan duration = TimeSpan.FromMilliseconds(500);
var rotateAnimation = new DoubleAnimation(RotationAngle(index), duration);
var xAnimation = new DoubleAnimation(TranslationX(index), duration);
var zAnimation = new DoubleAnimation(TranslationZ(index), duration);
rotation.BeginAnimation(AxisAngleRotation3D.AngleProperty, rotateAnimation);
translation.BeginAnimation(TranslateTransform3D.OffsetXProperty, xAnimation);
translation.BeginAnimation(TranslateTransform3D.OffsetZProperty, zAnimation);
}
Edit 2014-02-23 : Code has moved to github.
WPF Cover Flow Tutorial : Part 2
Since Part 1, we now know how to display a cover in 3D.
In order to display a reflection mirror, we add another GeometryModel3D to our Model3DGroup. This new element will be based on these points :
For the texture, we use a VisualBrush object and we apply a LinearGradientBrush to the image OpacityMask :
 There are two possibilities to browse the covers :
 The current cover will be put in front. The other covers will be rotated and placed on each side of the current cover. When the camera will move, the current cover will be moved back with the unselected ones, and the newly selected cover will be put in front.
There are two transformations : a rotation and a translation on X and Z axes. The rotation angle will be 90, 0 or -90 degrees. The Z translation will be 0 or 1 for the current cover. The X translation will be 0 for the current cover, or proportional to the distance from the origin. For each cover, we will save its position. We will compare the cover position with the current index to compute the transformation parameters. This gives us :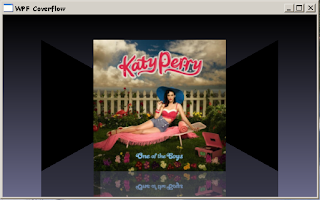 We need to replace our single light source with two different ones :
 Continue with Part 3.
Edit 2014-02-23 : Code has moved to github.
In order to display a reflection mirror, we add another GeometryModel3D to our Model3DGroup. This new element will be based on these points :
using Point2D = System.Windows.Point;We define the Point2D alias because of the conflict with System.Drawing.Point.
private Geometry3D TessellateMirror()
{
var p0 = new Point3D(-1, -3, 0);
var p1 = new Point3D(1, -3, 0);
var p2 = new Point3D(1, -1, 0);
var p3 = new Point3D(-1, -1, 0);
var q0 = new Point2D(0, 1);
var q1 = new Point2D(1, 1);
var q2 = new Point2D(1, 0);
var q3 = new Point2D(0, 0);
return BuildMesh(p0, p1, p2, p3, q0, q1, q2, q3);
}
For the texture, we use a VisualBrush object and we apply a LinearGradientBrush to the image OpacityMask :
using MediaColor = System.Windows.Media.Color;
private Material LoadImageMirror(ImageSource imSrc)
{
   var image = new System.Windows.Controls.Image();
   image.Source = imSrc;
   MediaColor startColor = MediaColor.FromArgb(127, 255, 255, 255);
   MediaColor endColor = MediaColor.FromArgb(127, 255, 255, 255);
   image.OpacityMask = new LinearGradientBrush(startColor, endColor, 90.0);
   var brush = new VisualBrush(image);
   return new DiffuseMaterial(brush);
}
 There are two possibilities to browse the covers :
- Keep the camera at the very same place and translate/rotate all covers as we are browsing.
- Transform only a few covers (e.g. the one currently selected) and move the camera.
 The current cover will be put in front. The other covers will be rotated and placed on each side of the current cover. When the camera will move, the current cover will be moved back with the unselected ones, and the newly selected cover will be put in front.
There are two transformations : a rotation and a translation on X and Z axes. The rotation angle will be 90, 0 or -90 degrees. The Z translation will be 0 or 1 for the current cover. The X translation will be 0 for the current cover, or proportional to the distance from the origin. For each cover, we will save its position. We will compare the cover position with the current index to compute the transformation parameters. This gives us :
private readonly int pos;Applying the transformations to our Model3DGroup is easy. We create the transformation in the constructor with a default index of 0 :
private double RotationAngle(int index)
{
return Math.Sign(pos - index) * -90;
}
private double TranslationX(int index)
{
return pos * .2 + Math.Sign(pos - index) * 1.6;
}
private double TranslationZ(int index)
{
return pos == index ? 1 : 0;
}
private readonly AxisAngleRotation3D rotation;Then, we will call the Animate method the transform the cover :
private readonly TranslateTransform3D translation;
public Cover(string imagePath, int pos)
{
this.imagePath = imagePath;
this.pos = pos;
ImageSource imSrc = LoadImageSource();
modelGroup = new Model3DGroup();
modelGroup.Children.Add(new GeometryModel3D(Tessellate(), LoadImage(imSrc)));
modelGroup.Children.Add(new GeometryModel3D(TessellateMirror(), LoadImageMirror(imSrc)));
rotation = new AxisAngleRotation3D(new Vector3D(0, 1, 0), RotationAngle(0));
translation = new TranslateTransform3D(TranslationX(0), 0, TranslationZ(0));
var transformGroup = new Transform3DGroup();
transformGroup.Children.Add(new RotateTransform3D(rotation));
transformGroup.Children.Add(translation);
modelGroup.Transform = transformGroup;
Content = modelGroup;
}
public void Animate(int index)If we create three covers, we realize that only one is visible :
{
rotation.Angle = RotationAngle(index);
translation.OffsetX = TranslationX(index);
translation.OffsetZ = TranslationZ(index);
}
 We need to replace our single light source with two different ones :
<ModelVisual3D>
  <ModelVisual3D.Content>
    <DirectionalLight Color="White" Direction="1,0,-3" />
  </ModelVisual3D.Content>
</ModelVisual3D>
<ModelVisual3D>
  <ModelVisual3D.Content>
    <DirectionalLight Color="White" Direction="-1,0,-3" />
  </ModelVisual3D.Content>
</ModelVisual3D>
 Continue with Part 3.
Edit 2014-02-23 : Code has moved to github.
Tuesday, October 14, 2008
WPF Cover Flow Tutorial : Result
Here is a sample video that shows the power of WPF :
These poor videos were done with Windows Media Encoder. CamStudio actually performs much more better. I will use the latter for the next screencasts.
Monday, October 13, 2008
WPF Cover Flow Tutorial : Part 1
Disclaimer : if you don't know anything about WPF, you should read this excellent tutorial. This should be considered as Part 0.
Now, I will describe how to develop a Cover Flow component in WPF.
 The z-axis is not visible here. Actually, it is going in your direction.

The first basic task will just display one cover in the middle of the screen.
In 3D, we usually work with triangles.
So we simply cut the square in two :
Let's start with the code. We create the 4 points :


But 2D texturing uses :
So the coordinates associations are :
This gives us a Tesselate method that will return the mesh :

We place the camera at (0, 0, 3). We add a light source so that we will not see black objects.
We also add an empty ModelVisual3D object that will contain our single cover (for now).
Here is the xaml code :
 This can be prettier if we add some background :
 Continue with Part 2.
Edit 2011-06-07 : Only one normal is needed per triangle. Source code has not been updated.
Edit 2014-02-23 : Code has moved to github.
Now, I will describe how to develop a Cover Flow component in WPF.
 The z-axis is not visible here. Actually, it is going in your direction.
The first basic task will just display one cover in the middle of the screen.
In 3D, we usually work with triangles.
So we simply cut the square in two :
Let's start with the code. We create the 4 points :
var p0 = new Point3D(-1, -1, 0);
var p1 = new Point3D(1, -1, 0);
var p2 = new Point3D(1, 1, 0);
var p3 = new Point3D(-1, 1, 0);
Then we create a MeshGeometry3D object. This object will contain our model. In order to build a model, we need to set all the points. Then, for each triangle, we define the point indices and the normals. To calculate the normals, I use the same method as the one defined in Part 0.
private Vector3D CalculateNormal(Point3D p0, Point3D p1, Point3D p2)
{
  var v0 = new Vector3D(p1.X - p0.X, p1.Y - p0.Y, p1.Z - p0.Z);
  var v1 = new Vector3D(p2.X - p1.X, p2.Y - p1.Y, p2.Z - p1.Z);
  return Vector3D.CrossProduct(v0, v1);
}
For the first triangle, we take the first 3 points. The normal is OK with these points (going towards us, in the positive direction of the z-axis). We need to pay attention to the second triangle. If we simply take the points in the same order (e.g. 1, 2 and 3), the normal will be inverted, in the negative direction of the z-axis. So we choose the points 0, 2 and 3.var mesh = new MeshGeometry3D(); mesh.Positions.Add(p0); mesh.Positions.Add(p1); mesh.Positions.Add(p2); mesh.Positions.Add(p3); var normal = CalculateNormal(p0, p1, p2); mesh.TriangleIndices.Add(0); mesh.TriangleIndices.Add(1); mesh.TriangleIndices.Add(2); mesh.Normals.Add(normal); normal = CalculateNormal(p2, p3, p0); mesh.TriangleIndices.Add(2); mesh.TriangleIndices.Add(3); mesh.TriangleIndices.Add(0); mesh.Normals.Add(normal);As far as texturing is concerned, I strongly advise you to read Daniel Lehenbauer's Blog. We need to deal with 4 points, but in 2D this time :
var q0 = new Point(0, 0);
var q1 = new Point(1, 0);
var q2 = new Point(1, 1);
var q3 = new Point(0, 1);
As you've read in Daniel's post, there is a big difference between 3D and 2D texture conventions. In 3D, you have :


But 2D texturing uses :
So the coordinates associations are :
- p0 <-> q3
- p1 <-> q2
- p2 <-> q1
- p3 <-> q0
mesh.TextureCoordinates.Add(q3);
mesh.TextureCoordinates.Add(q2);
mesh.TextureCoordinates.Add(q1);

mesh.TextureCoordinates.Add(q0);
mesh.TextureCoordinates.Add(q1);
mesh.TextureCoordinates.Add(q2);
The mesh will be frozen for performance reasons. In the future, we will only need to transform this mesh with rotations and translations. We will not need to move the points.
This gives us a Tesselate method that will return the mesh :
private Geometry3D Tessellate()
{
  var p0 = new Point3D(-1, -1, 0);
  ...
  var mesh = new MeshGeometry3D();
  ...
  mesh.Freeze();
  return mesh;
}
This method will be part of a Cover class. This class will be the main class to deal with covers. Here are two more methods that will help us to load the texture image :private ImageSource LoadImageSource(string imagePath)
{
Image thumb = Image.FromFile(imagePath);
return new BitmapImage(new Uri(imagePath, UriKind.RelativeOrAbsolute));
}
private Material LoadImage(ImageSource imSrc)
{
return new DiffuseMaterial(new ImageBrush(imSrc));
}
We finish the class with its constructor :using ...
namespace Ded.Tutorial.Wpf.CoverFlow.Part1
{
class Cover : ModelVisual3D
{
#region Fields
private readonly Model3DGroup modelGroup;
#endregion
#region Private stuff
private Vector3D CalculateNormal(Point3D p0, Point3D p1, Point3D p2)...
private Geometry3D Tessellate()...
private ImageSource LoadImageSource(string imagePath)...
private Material LoadImage(ImageSource imSrc)...
#endregion
public Cover(string imagePath)
{
ImageSource imSrc = LoadImageSource(imagePath);
modelGroup = new Model3DGroup();
modelGroup.Children.Add(new GeometryModel3D(Tessellate(), LoadImage(imSrc)));
Content = modelGroup;
}
}
}
Let's load this class in an empty WPF application.
We place the camera at (0, 0, 3). We add a light source so that we will not see black objects.
We also add an empty ModelVisual3D object that will contain our single cover (for now).
Here is the xaml code :
<Window x:Class="Ded.Tutorial.Wpf.CoverFlow.Part1.TestWindow"
 xmlns="http://schemas.microsoft.com/winfx/2006/xaml/presentation"
 xmlns:x="http://schemas.microsoft.com/winfx/2006/xaml"
 Title="WPF Coverflow" Height="320" Width="512">
<Grid>
 <Viewport3D x:Name="viewPort" Grid.Column="0" Grid.Row="0" ClipToBounds="False">
   <Viewport3D.Camera>
     <PerspectiveCamera x:Name="camera" Position="0,0,3"
       UpDirection="0,1,0" LookDirection="0,0,-1"
       FieldOfView="100" NearPlaneDistance="0.125"/>
   </Viewport3D.Camera>
   <Viewport3D.Children>
     <ModelVisual3D>
       <ModelVisual3D.Content>
         <DirectionalLight Color="White" Direction="0,0,-4" />
       </ModelVisual3D.Content>
     </ModelVisual3D>
     <ModelVisual3D x:Name="visualModel">
     </ModelVisual3D>
   </Viewport3D.Children>
 </Viewport3D>
</Grid>
</Window>
This simple application will display : This can be prettier if we add some background :
<Grid.Background>
 <LinearGradientBrush StartPoint="0,0" EndPoint="0,1">
   <LinearGradientBrush.GradientStops>
     <GradientStop Color="Black" Offset="0"/>
     <GradientStop Color="#696988" Offset="1"/>
   </LinearGradientBrush.GradientStops>
 </LinearGradientBrush>
</Grid.Background>
 Continue with Part 2.
Edit 2011-06-07 : Only one normal is needed per triangle. Source code has not been updated.
Edit 2014-02-23 : Code has moved to github.
Subscribe to:
Posts (Atom)